Fra Angelico
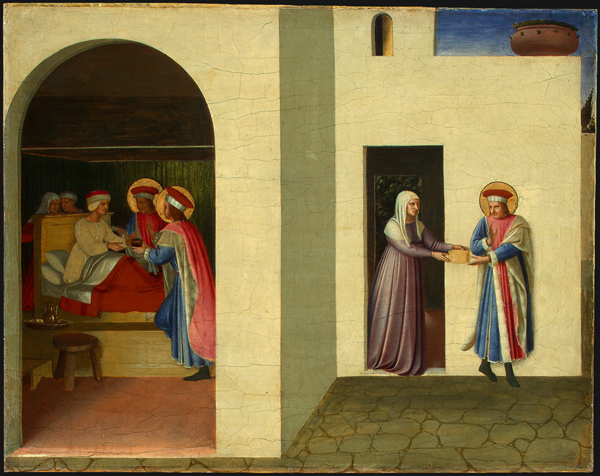
The Healing of Palladia by Saint Cosmas and Saint Damian, c. 1438/1440
Tempera and oil on poplar, 36.2 x 46.3 cm (15 x 18 11/16 in.)
National Gallery of Art, Washington, DC, Samuel H. Kress Collection
Image courtesy of the Board of Trustees, National Gallery of Art
Receding architectural planes and naturalistic light and shade contribute to the convincing illusion of three-dimensional space in The Healing of Palladia by Saint Cosmas and Saint Damian, c. 1438/40, by Fra Angelico. The same features aid in the representation of continuous narrative by dividing the setting into distinct zones so that each of the two episodes takes place within its own frame-within-the-frame. On the left, in the darkened bedroom seen through an open archway, Saint Cosmas and Saint Damian attend Palladia at her sickbed. On the right, framed by brightly illuminated stucco walls, Saint Damian reappears with the miraculously healed Palladia, who offers him a gift in thanks for healing her.
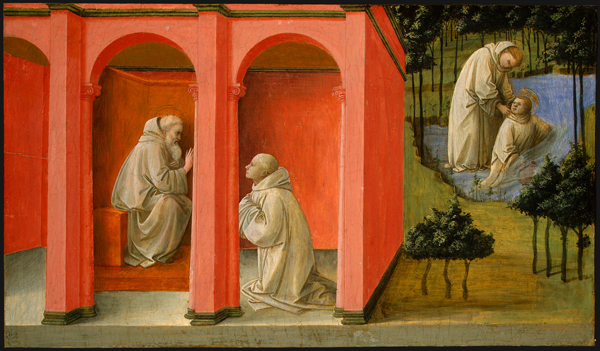
Fra Filippo Lippi
St. Benedict Orders Saint Maurus to the Rescue of St. Placidus, 1445/1450
Tempera on panel, 40 x 69.5 cm (15 3/4 x 27 3/8 in.)
National Gallery of Art, Washington, DC, Samuel H. Kress Collection
Image courtesy of the Board of Trustees, National Gallery of Art
Similarly, in Saint Benedict Orders Saint Maurus to the Rescue of Saint Placidus, c. 1445/50, Fra Filippo Lippi sequestered the initial call to action within the warm red walls of a building and placed the subsequent rescue outdoors amid the cool blues and greens of a landscape setting. Landscape and architectural elements separate the narrative episodes through marked spatial disjunctions. The passing of time is expressed as a stark contrast between “before” and “after.”
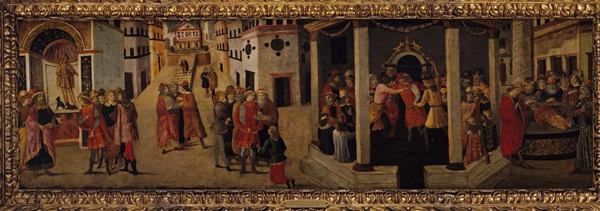
Master of the Apollini Sacrum
The Death of Julius Caesar, late 15th century
Tempera on wood, 47 x 150.43 cm (18 1/2 x 59 1/5 in.)
Spencer Museum of Art, University of Kansas, Samuel H. Kress Collection
The elongated format of cassone (dowry chest) panels enabled artists to include multiple events within a unified lateral space. In The Death of Julius Caesar, an undated fifteenth-century cassone panel, the Master of the Apollini Sacrum (see interactive) used architectural markers and self-contained figure groups to differentiate four separate incidents (each featuring Caesar) that unfold consecutively from left to right:
- At far left a group of priests gathered before a pagan shrine warn Caesar of evil portents.
- At the foot of a long avenue, a crowd prevents Caesar from attending to the scroll that divulges details of the plot against him.
- In the colonnaded senate building the conspirators carry out the assassination.
- At far right well-wishers surround Caesar’s funeral pyre.
The events tick by in chronological order, but the artist has given the assassination special prominence as the dramatic climax of the story. The commanding presence of the senate building, in which the murder occurs, infringes on the actions taking place on either side and pushes out into the viewer’s space. Moreover, its greater number of actors adds to the scene’s prominence and the amount of time needed to visually process it. In this way, the artist manipulated the pacing of the story—just as a writer or storyteller would do with a verbal narrative. The rising action of the two preceding episodes builds toward the crisis point—the killing of Caesar—while the succeeding scene represents the falling action, or denouement.
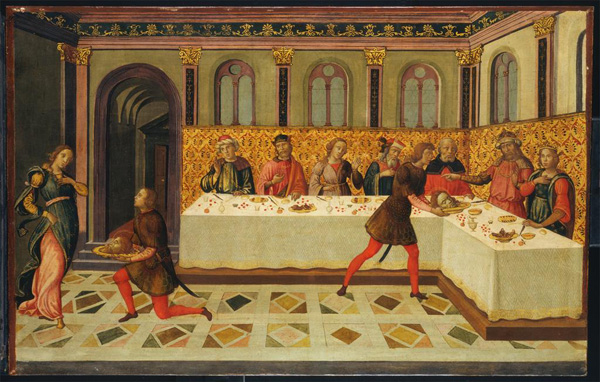
Master of the Apollo and Daphne Legend
The Martyrdom of St John the Baptist, c. 1500
Paint on wood, 59.7 x 94.3 cm (23 1/2 x 37 1/8 in.)
Howard University Gallery of Art, Washington, DC, Samuel H. Kress Collection
A very different approach to narrative structure and pacing is evident in The Martyrdom of Saint John the Baptist, another cassone panel painted at the close of the fifteenth century. At far left is Salome, whose dancing so entertained King Herod that he promised her anything she wished. Salome’s mother, Herodias, who wanted vengeance on Saint John for opposing Herodias’s marriage to the king, had urged Salome to make the shocking request: “Bring me the head of Saint John the Baptist.” Bound to adhere to his promise, Herod had the saint executed. At far right we see the presentation of his head to Herodias.
The long format of the cassone panel inspired the artist to introduce a suspenseful pause between the “before” and the “after” of the story, so that time expands, accordion-like, at the center of the painting. Time collapses at the two ends, where the figures of Salome and Herodias economically reference the earlier and later moments in the story. Salome’s plaintively tilted head and hand laid on her heart express her emotions upon seeing the prophet’s head on a platter, while her swirling skirts and elegantly positioned feet hark back to the fateful dance. At the opposite side of the room the head of Saint John appears again. Herodias mimics Salome’s startled gesture with one hand while fingering a knife with the other—reminding us of her earlier role in the prophet’s death. Five seated guests bridge the gap between the beginning of the narrative on the left and its conclusion on the right. The two sitting closest to Salome look toward her with troubled gestures and facial expressions. The next three turn to the right and respond with similar emotion to the grisly trophy delivered to Herodias. The measured repetition of windows, pilasters, and other architectural elements across the middle section reinforces our sense of a suspenseful interval as we gradually make our way from one dramatic incident to the next.